Truly Scrumptious was written by myself on 23rd of May 2013. It is my own idea and creation. Any similarity to any other tag or tutorial is co incidental.
Supplies Needed
Tube of choice. I have used the awesome artwork of Elias Chatzoudis HERE
Gorgeous Ftu Scrap kit ' A Berry Bright Spring ' By Kaci @ Scrappin Krazy Designs HERE
Template 40 By Me HERE
Filters Used
Xero - Radiance
Open template, duplicate and close original. Delete credits, large red rectangle and large dotted circle layer.
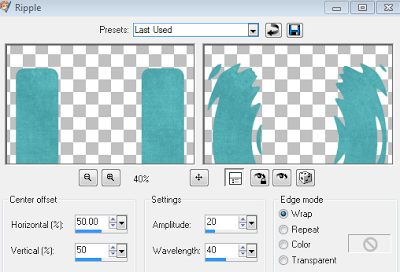
In layer palette merge red rectangle 1 and 2. selections - float. C/paste paper 2 as a new layer. De float and Invert the selection, hit delete. Select none and delete original temp layer. Go to Effects - Distortion effects and apply Ripple, see settings below. Take the freehand selection tool and draw around the main part of the layer ( see image below ) invert the selection and hit delete to remove excess ripple we don't want in the tag. D/shadow.
Back to layer palette - Black Circle. Selections - float . C/paste paper 7 as a new layer. De float, invert and delete. Select none. Delete original temp layer.
Repeat same fill process for these layers..
Black rectangle - Paper 9. Delete original temp layer, D/shadow.
Grey rectangle - paper 5. Blend mode - overlay ( keep original temp layer ) add light radiance.
Grey Circles - Paper 6. D/shadow. Delete original temp layer. Use manual colour correction to change small dotted circles from black to the blue colour from the kit.
White circles. Paper 7. D/ shadow. Delete original temp layer.
Central Black circle- Float. C/paste Element 26 - white flower. Re size to 145%. position beneath the selection. De float - invert and delete. Select None and delete original temp layer. Apply Same Ripple effect used on our first layer.
Large white circle- float- C/paste paper 5. De float- invert and delete. Select none. Adjust gaussian blur by 2 and float again. Apply Texture Effects - Mosaic Glass. Then texture Effects - Weave .See settings below. Select none.
Word Art- Scrumptious- float and fill with paper of choice , I used 5 again and apply same texture effects we used for white circle. Select none, delete original temp layer. Merge layer down with white word art and apply a slight shadow.
Word Art - Truly- Use manual colour correction to change the colour to your liking. Float and expand by 2. add new raster layer and flood fill the floating selection with white. Select none. Move new white layer below original merge down and again shadow.
C/paste your tube and position. Add a light radiance to suit your tube and drop shadow.
Now work elements of choice from kit around the tube and temp layers. Drop shadow to your liking. I used ....
Element 9 Milkshake. Left of tag behind tube layer.
Element 2 Butterfly. Re size 35%. Rotate left by 12. Top left of tag.
Element 18 Cherries. Re size 40%. Bottom left of tag behind word art, above milkshake layer.
Element 7 Cupcake. Re size 60%. Mirror and position bottom right behind word art.
Element 13 Tall Sundae. Mirror and rotate to right by 4. Position right of tag behind tube layer.
Element 3 Butterfly. Re size 40%. Right of tag above sundae.
Element 19 Flower. Re size 35%. Duplicate twice and position around the edge of white circle.
Element 22 Strawberry Frame. Re size 120%. Position Above the rippled layer and use raster deform tool to stretch out the sides a little.
Merge visible. Crop/re size and sharpen to your liking. add name and relevant artist copyright and tube licence. Save as Png. Thank you for stopping by and trying this tutorial. I hope you are pleased with your results. Sal :)
Same tag using a Lady Mishka exclusive Tube from Scraps and the city.


No comments:
Post a Comment