Friday 31 May 2013

FTU Bringing Sexy Back

Bringing Sexy Back was written by Myself on 31st May 2013. It is my own idea and creation. Any similarity to any other tag or tutorial is co incidental.

Supplies Needed
Tube of choice. I have used the stunning artwork of Diana Gali - available from SATC   HERE
Fantastic Ftu Scrap kit is ' Let's Try' by Gimptastic Scraps  HERE 
Template 42 by Me  HERE
Mask Wsl-180 by Chelle  HERE

Filters Used.
Xero - Radiance
PhotoEffex - Scanlines
EyeCandy - Chrome and Shadow


Open template, duplicate and close original. Delete credits.
In layer palette select Blue rectangle. Float and c/paste paper 1 - re sized to 105%. De float, invert the selection and hit delete. Select none and delete original temp layer.

Back in layer palette merge blue rectangle 1 and 2. Float and c/paste paper 4. De float, invert and delete. Select none and delete temp layer.

Layer palette - Merge pink rectangle 1 and 2.  Float, C/paste paper 2. De float, invert and delete. select none and apply EyeCandy - Chrome see settings below. 


Layer palette - Merge Grey rectangle 1 and 2. Float, c/paste paper 1. De float invert and delete. Select none and delete temp layer.

Thin Grey rectangle - Apply chrome with settings as before changing colour from zebra to silver then apply Photoeffex - Scanlines on default settings. Drop shadow.

Purple Circle- Same float and fill method as used on previous layers. I used paper paper 7. D/shadow.

Pink Octo - Float - C/paste paper 2. De float, invert and delete. Still floated c/paste a close up of your tube and position as desired below the selection. Hit delete again on the tube layer. Select none. Apply Xero - Radiance to your tube and change blend mode to Luminance legacy. Still on tube layer take your freehand selection tool and draw around the outline of lips as neatly as possible. you may find it easier if you zoom in. Once the lips are floated go to selections menu and promote selection to layer. Select none, change blend mode to hard light and reduce opacity to your liking . Mine is at 80. Repeat process for pupils of eyes. Keeping opacity at 100.

Octo Frame and Stars - Apply Chrome - settings as before - silver. Apply shadow.

Word art 1. Float Apply Outer bevel. Settings below. De float.


Word art 2. Float. C/Paste paper  7. De float, invert and delete. Select none and delete temp layer. Float the new layer and again apply outer bevel. Select none. Merge down with white layer and shadow.

Word art 3.  Adjust color balance - manual color correction- change from blue to colour of choice. I used red from paper used for word art 2.

C/paste your main tube. Position to left of canvas . Duplicate. Drop shadow the original - bottom copy and working on the top copy - adjust gaussian blur by 3 and change blend mode to soft light.

Now work desired elements from kit around tube and template layers and drop shadow to your liking. I used ....
Swirl - 50%. Position top right of canvas. Duplicate and mirror copy to left.

Heart - 50%. Position top right of rectangle. Duplicate, mirror copy to left.

Bullet - Bottom left of canvas.

Chain - 50%. Bottom left above Bullet layer.

Dice - 60%. Bottom left above chain layer.

Flower 2 - 60% - Rotate right by 12.  Above and to the right of Dice.

Nail Polish - 60%. Bottom right of Canvas.

Handcuffs - 60 %. Flip and rotate left by 35. Position right of canvas above nail polish. Use selection tool or eraser to remove part of cuff so that it appears to be hooked over thin rectangle.

Choker. Rotate left by 6. Bottom right above nail polish, behind stars/ word art.

Doodle 1 - 90% - Rotate left by 90. Bottom of canvas. Above choker, behind word art. I darkened colour slightly using manual color correction.

Sparkles. Centre of canvas. Above close up. Behind main tube.

Mask layer. C/paste paper of choice from kit. I used paper 6, re sized to 115%. Move to bottom of layer palette and load mask from disk - fit to layer. In layer palette, delete mask and merge group. Use raster deform to stretch and position to your liking.

Merge visible and Crop/re size and sharpen to your liking. Add name and relevant artist copyright and tube licence info. Save as Png...
Hope you have enjoyed this tutorial and your happy with the results.
Sal :)


Sunday 26 May 2013

PSP Templates 43 & 44


FTU Curves


Curves was written by Myself on 25th May 2013. It is my own idea and creation. Any similarity to any other tag or tutorial is co incidental .

Supplies Needed.
Tube of choice. I have used Floreta, a fabulous Ftu tube from Elias Chatzoudis  HERE
Fantastic Ftu Scrap kit ' Flirty In Pink' by Mary @ Sweet As Honey Creationz  HERE  
Mask Wsl353 by Chelle  HERE
Template 35 by Me  HERE

Filters Used
Xero - Radiance

Open template, duplicate and close original. Delete credits and Grey rectangle layer.

In Layer Palette - lilac circ 1. Selections - float. C/paste paper 7, re sized to 60%. De float, invert the selection and hit delete. Select none and delete original temp layer. Repeat for lilac circle 2.

Layer Palette - Large Blue rectangle - Float. C/paste paper 1. De float, invert and delete. Select none. Delete temp layer. 

Layer Palette - Merge thin blue rect 1 and 2 . Float. C/paste paper 10. De float, invert and delete. Select none and delete temp layer. D/shadow.

Layer Palette - White stripes - leave as is and drop shadow. 

Circle - Float. C/paste paper 4. De float, invert and delete. Select none and delete original temp layer. Above the circle C/paste Frame 1 from kit, re sized at 80%. Using the magic wand tool, click in the centre of frame to float. Modify - Expand the selection by 12. Below frame above circle, C/paste Element Heart 2 re sized to 110%. Centralise it beneath the selection. Invert and hit delete to remove excess heart . Select None. 
Working on the heart layer. Layer menu - Load mask from disk - Fit to layer. In layer palette - delete mask and merge group. Above this layer, behind frame layer, C/paste Screen 1 element. Add a drop shadow to frame.

On to the word art. 
Flaunt- Selections - float- modify- expand by 2. Add new layer and fill the selection with white. Select none . Move new white layer below original layer and merge down. Add shadow.
Small Curves - I re sized to 102 %.
Large Curves. - Using magic wand tool, click inside each letter to float. C/paste paper 4. Invert the selection and hit delete. Select None. If like me you want a bolder out line, Float the original word art- De float - modify - select selection borders- Border width 3, both sides, anti alias checked. Add new raster layer and flood fill the selection with black. Select none. Apply bevel or chrome to your liking. D/shadow.

C/paste your tube and position behind word art. Apply Xero - Radiance to suit and drop shadow. Now work desired elements from kit around tube and temp layers and drop shadow to your liking. I used ....

Cupcakeskull - re sized to 60%. Left of tag behind tube layer.

Bow 1 - re sized 40%. Position bottom right of tag, behind large word art. Duplicate and mirror copy to left. 

Heart 2 - re sized 40%. Right of tag behind bow, duplicate and mirror copy to left.

Emo Pills- re sized 40%. Bottom left of tag above word art and bow.

Cherries 1 - re sized 40%. Top right of tag, behind tube layer.

Bow 2 - re sized 35%. Top left of tag behind word art.

Skullcake -  re sized 40%. Bottom right of tag, behind Bow.

Mask Layer - C/paste paper 10 re sized to 85%. Move to bottom of layer palette. Go to layer menu. Load mask from disk- fit to layer. Delete mask in layer palette and merge group.

Merge visible. Crop/re size and sharpen to your liking. Add name and relevant copyright and licence info. Save as Png. 
Thank you for stopping by and trying this tutorial. I hope you are pleased with your tag.
Sal :)

Thursday 23 May 2013

FTU Truly Scrumptious

Truly Scrumptious was written by myself on 23rd of May 2013. It is my own idea and creation. Any similarity to any other tag or tutorial is co incidental.

Supplies Needed
Tube of choice. I have used the awesome artwork of Elias Chatzoudis  HERE
Gorgeous Ftu Scrap kit ' A Berry Bright Spring ' By Kaci @ Scrappin Krazy Designs  HERE
Template 40 By Me  HERE

Filters Used
Xero - Radiance

Open template, duplicate and close original. Delete credits, large red rectangle and  large dotted circle layer.
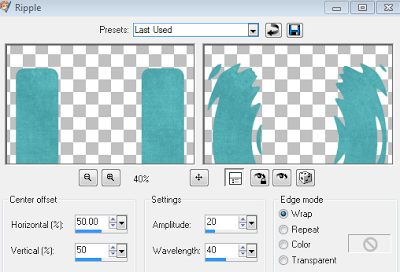
In layer palette merge red rectangle 1 and 2. selections - float. C/paste paper 2 as a new layer. De float and Invert the selection, hit delete. Select none and delete original temp layer.  Go to Effects - Distortion effects and apply Ripple, see settings below. Take the freehand selection tool and draw around the main part of the layer ( see image below ) invert the selection and hit delete to remove excess ripple we don't want in the tag. D/shadow.


Back to layer palette - Black Circle. Selections - float . C/paste paper 7 as a new layer. De float, invert and delete. Select none. Delete original temp layer.
Repeat same fill process for these layers..

Black rectangle - Paper 9. Delete original temp layer, D/shadow.

Grey rectangle - paper 5. Blend mode - overlay ( keep original temp layer ) add light radiance. 

Grey Circles - Paper 6. D/shadow. Delete original temp layer. Use manual colour correction to change small dotted circles from black to the blue colour from the kit.

White circles. Paper 7. D/ shadow. Delete original temp layer.

Central Black circle- Float. C/paste Element 26 - white flower. Re size to 145%. position beneath the selection. De float - invert and delete. Select None and delete original temp layer. Apply Same Ripple effect used on our first layer. 

Large white circle- float- C/paste paper 5. De float- invert and delete. Select none. Adjust gaussian blur by 2 and float again. Apply Texture Effects - Mosaic Glass. Then texture Effects - Weave .See settings below. Select none.


Word Art- Scrumptious- float and fill with paper of choice , I used 5 again and apply same texture effects  we used for white circle. Select none, delete original temp layer. Merge layer down with white word art and apply a slight shadow.

Word Art - Truly- Use manual colour correction to change the colour to your liking. Float and expand by 2. add new raster layer and flood fill the floating selection with white. Select none. Move new white layer below original merge down and again shadow.

C/paste your tube and position. Add a light radiance to suit your tube and drop shadow.
Now work elements of choice from kit around the tube and temp layers. Drop shadow to your liking. I used ....
Element 9 Milkshake. Left of tag behind tube layer.

Element 2 Butterfly. Re size 35%. Rotate left by 12. Top left of tag.

Element 18 Cherries. Re size 40%. Bottom left of tag behind word art, above milkshake layer.

Element 7 Cupcake. Re size 60%. Mirror and position bottom right behind word art.

Element 13 Tall Sundae. Mirror and rotate to right by 4. Position right of tag behind tube layer.

Element 3 Butterfly. Re size 40%. Right of tag above sundae.

Element 19 Flower. Re size 35%. Duplicate twice and position around the edge of white circle.

Element 22 Strawberry Frame. Re size 120%. Position Above the rippled layer and use raster deform tool to stretch out the sides a little.

Merge visible. Crop/re size and sharpen to your liking. add name and relevant artist copyright and tube licence. Save as Png. Thank you for stopping by and trying this tutorial. I hope you are pleased with your results. Sal :)

Same tag using a Lady Mishka exclusive Tube from Scraps and the city.

Wednesday 22 May 2013

FTU Postcard From Paradise

Postcard from paradise was written by myself on 22nd May 2013. It is my own idea and creation. any similarity to any other tag or tutorial is co incidental.

Supplies Needed
Tube of choice. I have used the fabulous artwork of Cris DeLara, available from Up Your Art  HERE
Fabulous FTU Scrap kit Mermaidia by Kaci @ Scrappin Krazy Designs  HERE
Mask Wsl 98 by Chelle  HERE

Please leave the designer some thanks when snagging their freebies :)

Open a new image 700 x 700. From the kit c/paste Cluster 1 re sized to 70%. Move it down  down the canvas a little. Using selection tool on rectangle, draw a rectangle slightly larger than the inside of frame. C/paste paper 4 as a new layer. Invert the selection and hit delete. Select none and move this new layer below frame.

C/paste element 29 - frame re sized to 50%. Rotate to right by 12. Position top left of image behind cluster frame. Duplicate - mirror and flip the copy. Working on copy 1 (top left) take your magic wand and click inside frame to float. Modify - Expand by 2. C/paste paper 9 re sized to 50% rotated to right by 12. Move into desired position within the selection and invert and delete. Select none. Move new layer below frame. Repeat this step for copy 2 of frame using a different paper from kit. I used paper 10. Again re sized to 50 % and rotated right by 12. Apply a d/shadow to frames.
This is where you should be at this point...


C/paste your tube and position where desired. Drop shadow.  If using a half tube like I did, then duplicate and move copy beneath cluster frame. Working on the top copy, use your eraser tool to neaten and remove bottom of tube that covers cluster.

C/paste element 5 - Purple bubbles. Position left of canvas, behind tube layer. Duplicate and mirror the copy to the right. Move the right copy  a little higher up the canvas than the left. Take your magic wand tool and click several time inside the largest bubble until it floats in a neat circle. C/paste the face from your tube inside the selection. Invert and delete excess tube. select none. Change Blend mode to screen.  Repeat process for large bubble on opposite side, Mirroring the tube before you paste.

C/paste Element 58 - Purple flower. Re size 50%. Position bottom left of tag above cluster. Duplicate and re size copy 85%. Go to color balance in the adjust menu and use manual colour correction to change the colour to your liking. Merge layer down, duplicate and move copy to right of image. D/shadow.

C/paste Element 22 - coconuts. Re size 50% rotate left by 12 and place near the coconuts that are in the cluster frame. D/shadow.

C/paste Element 32 - leaves. Duplicate twice. Place copy 1 top left of image , above frames, behind tube. Place copy 2 bottom left behind cluster. Copy 3, re size 50%, mirror and place above coconuts.
Mask layer. In bottom of layer palette add a new raster layer and flood fill with colour of choice. I took a colour from the coconuts. Load mask from disk - fit to layer. In layer palette , delete mask and merge group. Duplicate layer to make it stronger and merge layer down. Apply Texture effects - sandstone. Settings below. Then apply Edge effects - Enhance  if you want a stronger effect.


Merge Visible and crop/re size and sharpen to your liking. Add name and relevant artist copyright and licence number. Save as Png .
Thank you for stopping by. Hope you have enjoyed this tutorial and your pleased with your tag. Sal :)

Sunday 19 May 2013

Psp Templates 41 & 42

Sorry ages since I last posted. Having a bit of a dry spell with the mojo and not had much spare time to throw myself into it. Have put together a few templates though. A couple of which are for download below and recently had a bash at making a few masks. Don't know whether they ll see the light of day ???. Maybe a bit more practice needed there... 


 HERE


Sunday 5 May 2013

PTU Walk On The Wild Side


Walk on the wild side was written by Myself on 4th May 2013. It is my own idea and creation. Any similarity to any other tag or tutorial is co incidental.

Supplies Needed

Tube of choice. I have used the amazing artwork of Arthur Crowe  HERE
Ptu Scrap kit... Dangerous B by Skyscraps  HERE
Mask 133 by Vaybs  HERE


Filters Used
Xero - Radiance
Xero - Nostalgia
DS - Dark Glass
Penta - Jeans


Open a new image 700 x 700. C/paste paper 5. Adjust gaussian blur by 3 and re size layer 85%. Load mask from disk - fit to layer and in layer palette delete mask and merge group. Re size again 85% and use raster deform tool to stretch out mask horizontally on each side by a couple of millimetres. 
Go to selections and float the mask. C/paste a close up of your tube and move into desired position below selection. top right of Image. De float, Invert and hit delete. Select none. Change blend mode of tube to screen and reduce opacity to around 40. Go back to mask layer, floating it will have deepened the opacity so reduce it  to your liking. I had mine at 85.

C/paste element 19-Firework. Re size 90% and position to left of close up. Roughly top centre of Image. D/shadow to your liking. 
C/paste element 41 - Brick Wall. Re size 40% and position top left of Image Behind firework layer and d/shadow.
C/paste element 60 -Pump. Re size to 55% and position bottom right of Image. Above this place element 61-Car re sized to 90%. D/shadow. C/paste element 15 - Cloud re sized 70 %. Position beneath car at bottom of image and apply Penta - Jeans - settings - 94 - 2 - 2. Change blend mode to multiply.

C/paste your main tube. Position to left of car. Apply Xero radiance to suit and d/shadow. 
To the top left of image, behind tube layer, above wall layer, C/paste element 62-walk sign. Re size to 40% and rotate left by 4. Behind this place element 53 - Paint Splatter re sized to 30%. D/shadow. 

C/paste Element 3-star frame. Mirror and re size to 60%. Position to left of tag. Behind Walk sign. Take your magic wand tool and click in centre to float. Modify expand by 3. Add a new raster layer. Flood fill with a 2 colour linear gradient. I had foreground on grey, background on black. Angle - 90 Repeats - 4.
Select none and move new layer below frame layer. Apply DC filters- Dark glass. reflection and threshold on 128. Then apply Penta - Jeans - Settings-94-2-2. Change Blend mode to Multiply.

C/paste element 68 - Polaroid  re sized to 25 %. Again using magic wand, click centre to float. C/paste your tube mirrored in opposite direction to other copies. Position beneath selection, invert and delete. Select none. Apply Xero - Nostalgia ( settings I used below ) Reduce opacity to 80 and merge layer down. Rotate to left by 6. Duplicate, mirror copy and re size 96%. Move beneath original. D/shadow.


C/paste element 67 - Barbed Wire. Re size to 75%. Position in between Polaroid layers and use eraser tool to remove the right half of element that extends onto the car. D/shadow.

Merge Visible. Crop/re size and sharpen to your liking. Add Name and relevant copyright and tube licence. Save as Png.
Thanks for stopping by. i hope you have enjoyed this tutorial and your pleased with the results.
Sal :)


Thursday 2 May 2013

FTU What's New Pussycat


What's New Pussycat was written by myself on the 1st of May 2013. It is my own idea and creation and any similarity to any other tag or tutorial is co incidental.

Supplies

Tube of choice. I have used a fantastic PinUp Toon 'Cosplay kitten'  from CDO  HERE  It was the inspiration for the fabulous ftu kit ' Inspired by PinUp Toons' created by Tasha @ Tasha's Playground as part of Aprils fantastically free blog train. You can get it  HERE  Don't forget to leave a thank you.:)
Template 38 Pussycat by Me HERE


Open template, duplicate and close original. Re size all layers 110% and adjust canvas size to 700 x 700.
Delete credits, background and dotted rectangle layers.

In layer palette - Merge black rectangle 1 and 2. Selections-float c/paste a paper from kit ( I used paper 5, rotated 90 degrees) De float, invert the selection and hit delete. Select none and delete original template layer. Drop Shadow to your liking.

Layer Palette - Grey Oval - Float. C/paste paper from kit ( I used paper 6 ) De float, Invert and delete. Select none and delete original temp layer. Apply Noise - Gaussian - 25. D/shadow.

Layer palette - Black Oval - Repeat as above, choosing different paper. I used paper 7.

Layer palette - Merge Grey rectangle 1 and 2. Float and c/ paste paper of choice. I used paper 6. De float, invert and delete. Select none. Change blend mode to hard light and merge down with original template layer. D/shadow.

Layer palette - Merge Paws. Float. C/paste paper 6. De float, invert and delete. Select none. Change blend mode to hard light and merge layer down with temp layer. Apply Noise- Gaussian - 25. D/Shadow.

C/Paste Scratches element re sized to 40%. Position top left of image above rectangles. Duplicate and move copy down and slightly to right. Repeat so there are 3 copies. when you are happy with positioning merge and drop shadow.

C/Paste your tube. Position above and to the right of scratches. Behind word art layers. D/shadow.

C/Paste remaining elements of choice from kit and drop shadow as desired. I used ...

Milk Bottle 1 - Re sized 70%. Bottom left of Image. Above temp layers. Behind word art.

Food Dish - Re sized 50%. Bottom left above milk bottle.

Yarn - Re sized 50%. Bottom left above food dish.

Flower 3 - Re sized 70%. Position bottom left behind yarn.

Lollipop 2 - Re size 60%. Left of tag behind Milk Bottle.

Mouse - Re size 40%. Top left of tag above lollipop 2.

Word Art 1 - Re size 45%. Top left of tag. Behind Mouse. Duplicate and move copy to bottom right of image behind word art.

Scatter - Re size 70%. Position left of image above rectangle layer. behind ovals. Duplicate and mirror copy to right.

Bow 2 - 80%. Bottom right. Behind word art and paws layers.

Lollipop - Re size 65 %.  Right of Tag. Behind bow layer.

Fish Bones - Re size 40%. Position Centre of image to left of tube. Duplicate, mirror copy and move to top right of image.

Word Art - I adjusted colour balance using manual color correction, added noise - gaussian - 20 to Pussycat and added a slight shadow using EyeCandy - Shadowlab.

Merge visible. Crop/re size and sharpen to your liking and add name, relevant artist copyright and licence info. Save as Png.... Done.
Thank you for stopping by and trying this tutorial. I hope you are pleased with your tag.
Sal :)


Related Posts Plugin for WordPress, Blogger...