Thursday 26 September 2013

FTU Autumn's Arrival


Autumn's Arrival was written by myself on 25th September 2013. It is my own idea and creation. any similarity to any other tag or tutorial is co incidental.

Supplies Needed
Tube - I have used the fabulous artwork of  Elias Chatzoudis
Beautiful Ftu Scrap kit ' Fall In Color'  by Mirella at A Space Between
Please leave thanks when downloading :)
Mask Wsl-78 by Chelle at WeescotslassCreations
Font used The NautiGal

Filters Used

Mura's Meister - Copies


Open a new image 700 x 700. 

Starting with the mask layer C/paste Paper 31 as a new layer. Load mask from disk - fit to layer. In layer palette, delete mask and merge group. Reduce opacity to 80%.

Above mask layer, c/paste element 46 - Frame re sized to 75%. Duplicate, change blend mode of copy to hard light, reduce opacity to 70% and merge down with original frame. Click in centre of frame with magic wand to float. Selections - modify - expand by 10. C/paste paper 7. Invert the selection and hit delete. Select none. Move paper layer below frame, d/shadow frame and merge down.

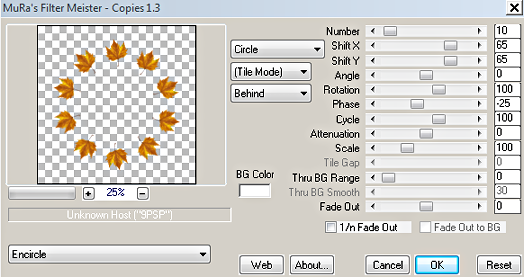
C/paste element 8 - leaf  re sized to 20%. Apply Mura's Copies - Encircle. (see settings below) Position behind Frame layer and d/shadow.


Above the frame layer C/paste your tube and position to the right. D/shadow. With your tube in place work desired elements from kit around tube and frame layers. D/shadow to your liking. I used ...


 Element 26 - Branch/clocks - 90%. Position behind tube layer.

36- Lantern - 105%. Position on the left side of the frame. Use eraser tool to remove string.

33- Berries/leaves Cluster - 70% - Image - Mirror. Bottom left, behind tube above Lantern.

28 - Small Berries - 30%. Position on left side behind Lantern. Duplicate and mirror copy to right side.

45 - Leaf - 30%. Bottom right, behind tube above Berries.

9 - Flower Scatter - 45%. Position behind Branch/Clocks to the left of tube.

Merge all layers. Crop/re size to your liking. I usually sharpen at this point rather than each separate element as I go along. Adjust - Sharpness - Unsharp Mask 5.0 - 30 -5.
Add name and relevant artist copyright and tube licence info.
Save as Png.

Thank you for stopping by and trying this tutorial. I hope you are pleased with your tag.
Sal :)


Monday 23 September 2013

Tag & Tut Show Off

Check out my new pressie !!! Gorgeous tag and tutorial, Absolutely Fabulous by Rhonda. Using my template 54 and the artwork of Alex Prihodko. To view this and her many other fantastic tuts visit Rhonda's blog  Rhonda's Rockin Designz 


Monday 16 September 2013

Tut & Tag Showoff

I have 2 new fantastic tutorials from Rhonda to show off. Firstly 'Shades of Autumn'. A gorgeous Pin up Toon creation using my Autumn template 3. Visit Rhonda's blog  Rhonda's Rockin Designz to check it out.

This second tutorial from Rhonda is 'Karma' - a Creative Chicks members exclusive using a Freya Langford-Sidebottom tube, also a Creative Chicks exclusive. CC is a super friendly psp forum group with great staff and members. Awesome member exclusives and challenges. Visit  HERE to register and come check it out.

The template used was created by myself and the scrap kit and mask by Vesta and Melissa , fellow CC members. These freebies are available for download from The Creative Chicks blog. HERE


Last but not least the following tags are pressies made for me, results of my tutorials. They are all fantastic and I love receiving them. Thank you xxx

Pammers

Ronda

Ronda

Bobbie

Bee

Bee

Bee

Bee

Bee

Bee


Saturday 14 September 2013

FTU Goodbye Summer


Goodbye Summer was written by Myself on 13th September 2013. It is my own idea and creation. Any similarity to any other tag or tutorial is co incidental.

Supplies Needed

Tube of choice. I have used the amazing artwork of  Arthur Crowe
Gorgeous Ftu scrap kit is 'Fall Frenzy' by Melissa at  Melissaz Creationz
Please leave a thank you when downloading :)
Mask Wsl228 by Chelle at  Weescotslass Creations
Template Autumn 1 by Me  HERE

Filters Used
Xero - Radiance
PhotoEffex - Scanlines
Tramages - Mo Jellyfish

Open template, duplicate and close original. Delete credits and background layers.

In layer palette - Large Rectangle. Click in centre with magic wand to float. Selections - Modify - Expand by 3. C/paste paper 6 with gaussian blur of 20. Invert the selection and hit delete. Move paper layer below rectangle. With centre still selected C/paste a large close up of your tube. Position to your liking behind the Frame and hit delete. Select none. Apply Xero - Radiance to suit your tube. Change blend mode to overlay then duplicate the layer and change blend mode of top copy to soft light.

Repeat this process for Left and Right Rectangle Frames. Making your tube smaller than the previous close up. Apply PhotoEffex - Scanlines on default setting. Duplicate the tube layer as before, bottom copy blend mode as Screen and top copy Soft Light.

Back in layer palette, merge all 3 Rectangle Frames. Add noise -Gaussian at 20% with monochrome checked. Then apply Tramages - Mo Jellyfish ( settings below) Duplicate frames, change blend mode of top copy to hard light and reduce opacity to around 70%. D/shadow bottom copy.


C/paste your main tube to the right of canvas behind fall word art. Apply Radiance if desired and d/shadow.

C/paste element 3 Leaves re sized to 60%. Position bottom left of tag behind left rectangle. Duplicate and mirror copy to right. Merge down, duplicate again and flip copy to top of tag. D/shadow.

C/paste element 5 Branch re sized to 50%. Position along bottom of tag behind word art, duplicate Image - Mirror and Flip. Position copy along top of tag behind tube layer and d/shadow both. Above the bottom layer where the branch ends c/paste element 26 Butterflies. Duplicate change blend mode of top copy to hard light, merge down and shadow.

On the left side of the canvas, behind the rectangle c/paste element 25 Twig re sized to 45%. Duplicate and mirror copy to right. D/shadow.

Mask layer. C/paste paper with a gaussian blur of 20 re sized to 95%. Load mask from disk - fit to layer. In layer palette delete mask and merge group. Re size layer again by 95% and use your raster deform to stretch and position to your liking. Apply PhotoEffex - Scanlines and Effects - Edge Effects - Enhance. Reduce opacity to 70%.

Merge all layers. Crop/re size to your liking. I usually sharpen at this point rather than each separate element as I go along. Adjust - Sharpness - Unsharp Mask 5.0 - 30 -5.
Add name and relevant artist copyright and tube licence info.
Save as Png.

Thank you for stopping by and trying this tutorial. I hope you are pleased with the results.
Sal :)


Friday 6 September 2013

Autumn Psp Tag Templates

I love all the autumn themed tubes and scrap kits around at the moment. The colours are just so gorgeous. So I thought I'd crack open the Psp and put some autumn themed templates together. I hope you can make use of them. They are in psd and psp format, just click the link at the bottom of the previews to take you to the download. 
Sal :)


Thursday 5 September 2013

FTU Pretty Pumpkin Picker


Pretty Pumpkin Picker was written by Myself on 4th September 2013. It is my own idea and creation. Any similarity to any other tag or tutorial is co incidental.

Supplies Needed

Tube of choice. I have used the beautiful artwork of Caron Vinson available at  CDO

Gorgeous Ftu Scrap Kit is 'Autumn Spice' by Teresa at  Topcats Tagz

Please leave a thank you when downloading these fab freebies :)

Mask Dbv85 by Vaybs at  Designs by Vaybs

Font used is Black Lightning


Open a new image 700 x 700. 
From kit, C/paste element 4 - Tree re sized to 110%. D/shadow.

Above this layer C/paste the Fence element 28 re sized to 85%. Move slightly lower down on the canvas. D/shadow.

Above the Fence layer c/paste Element 12 Branch re sized to 75 %. Rotate right by 20 and position on the lower right side of tag along the bottom of fence. Duplicate, Mirror copy to the left and merge layer down. D/shadow. Duplicate this merged layer add a gaussian blur of 5 and move below the fence layer, moving up the canvas slightly. Now duplicate this layer - Image -  flip and move down the canvas so it  shows below the first (original) layer. I used eraser tool to remove the stray leaf at the bottom on each side.

C/paste element 34 leaf Scroll re sized to 65%. Position above fence and branch layers on the left side of canvas. Duplicate and Image - Mirror copy to right. Merge layer down and d/shadow.

C/paste you tube and position to your liking above all other layers. D/shadow.

With your tube in place work desired elements from kit around tube and layers already in place and d/shadow to your liking. I used ....

34 Sign Post - 70%. Left of tag. Behind Scroll leaves.

26 Owl - 35%. Left of tag. Above Sign Post.

18 Pumpkin - 40%. Position bottom left above Branch behind scroll leaves. Duplicate, re size 80% and Image - Mirror. Place this copy behind the Branch. Duplicate again and re size 80% - Image - Mirror. Position copy 3 behind other copies, in front of Sign Post.

30 Sunflower - 50%. Rotate right by 16 degrees. Position bottom right of tag behind tube layer. Duplicate and mirror copy to the left side of your tube move it up slightly so there not quite symmetrical.

6 Pine cone/Berries - 30%. Bottom right, behind tube and Sunflower layer. Duplicate and Image - Mirror copy to bottom right side of tube.

22 Falling Leaves - 45%. Above tube layer.

Mask Layer - At the bottom of layer palette, C/paste paper 5 re sized to 70 %. Load mask from disk - Fit to layer. In layer palette delete mask and merge group. Re size to 95% and position to your liking. Apply - Effects - Texture Effects - Mosaic Glass with settings below.


Duplicate the mask layer and re size by 70%. Change the colours of this layer using Adjust - Color Balance -Manual Color Correction. My source was a brown taken from original mask layer and my target was the eye colour taken from my tube. Play around with the colours until you get the effect you like. Reduce opacity of first mask layer to around 90.

Merge all layers. Crop/re size to your liking. I usually sharpen at this point rather than each separate element as I go along. Adjust - Sharpness - Unsharp Mask 5.0 - 30 -5.
Add name and relevant artist copyright and tube licence info.
Save as Png.

Thank you for stopping by and trying this tutorial. I hope you are happy with your tag.
Sal :o)


Related Posts Plugin for WordPress, Blogger...