Deck The Halls was written by Myself on 18th November 2013. It is my own idea and creation. Any similarity to any other tag or tutorial is co incidental.
Supplies Needed
Tube of choice. I have used 'Winnie' the beautiful artwork of VeryMany at
VeryMany Tubes
Gorgeous Ftu Scrap kit is 'Christmas Fun' by Daph at
Daph's Scrappin Kreationz
Please leave a thank you :)
Template - Xmas Temp 1 by Me. You can get this
HERE
Font used - KG Melonheadz
Filters Used
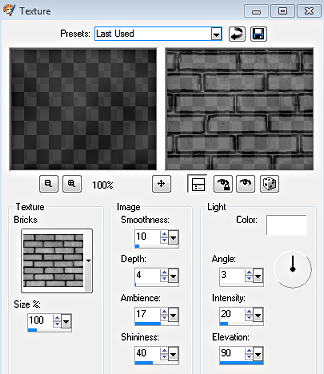
Xero - Radiance
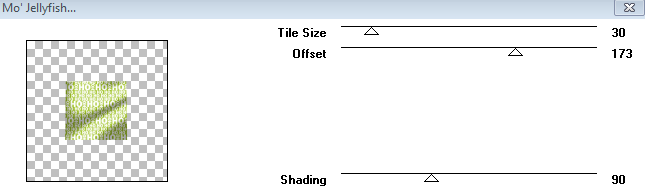
Tramages - Mo Jellyfish
Open template, duplicate and close original. Delete credits and dashed rectangles.
In layer palette - Red Rectangle. Selections - Select all - Float. C/paste paper 4 re sized to 90 %.
De float - Invert - Delete.
Select none and delete original temp layer. Apply Xero - Radiance (settings below) D/shadow.
Layer Palette - Yellow Line Rectangle. Adjust - Color balance- Manual color correction to change colour to white and d/shadow.
Layer Palette - Merge Yellow Rectangle 1 and 2. Selections - Select all - Float. C/paste paper 14 re sized to 80%. De float - Invert - Delete.
Select none and delete temp layer. Apply Radiance as before. D /shadow.
Layer Palette - Green Rectangle. Same float and fill method as previous layers using paper 10 at 90%.
Select none and delete temp layer.
Again apply Radiance as before. Add noise - 15 - gaussian - monochrome checked. D/shadow.
Layer Palette -Large Grey Circle. Float and fill method again using paper 10 at 90%.
No Radiance on this layer.
Select none, delete temp layer and d/shadow.
Layer Palette - Float and fill method using paper 7 with a gaussian blur of 15, re sized to 80%.
Select none. Delete temp layer. Apply Tramages - Mo Jellyfish (settings below)
Above this inner circle layer c/paste Frame 5 re sized to 70%. Rotate to left by 21 degrees. Use your raster deform tool to stretch and position the frame in line with the outer edge of the inner circle. Like me, you may find the bottom right of the Frame a little tricky to line up with the edge of the circle but don't worry to much as your tube will cover this ; )
Once happy with positioning change blend mode of Frame to overlay and d/shadow.
Above the Frame Layer and in the centre of the canvas c/paste Christmas Tree re sized to 65% and d/shadow.
C/paste your tube. Position to the right of the canvas above the Christmas Tree layer. D/shadow.
With your tube in place continue to work elements of choice around the tube and temp layers. D/shadow to your liking. I used ....
Berry Branch - 50 % - Rotate right by 8 degrees. Paste top left of canvas behind temp layers. Duplicate, Flip the copy and merge layer down. Now duplicate this merged layer and mirror to right side of tag.
Go back to the left side copy and duplicate again. Rotate to right by 90 % and place this copy at the top of the tag then duplicate once more and flip and position at the bottom. Merge all 4 layers, d/shadow and reduce opacity to 90%.
Christmas Sign - 45%. Place bottom left of tag, behind tube / Tree.
Ornaments 1,2,3 - 50%. Position and arrange bottom right. Behind tube.
Candy Cane 2 - 50 % - Rotate left by 12 degrees. Position on the right above Ornament.
Bow 6 - 40%. Top left of template. Duplicate and mirror copy to right.
Ribbon 4 - 30%. Left side of tag behind Sign.
Holly - 30% - Flip. Bottom left above sign behind tube. Duplicate and mirror copy to bottom right.
Merge all layers. Crop/re size to your liking. I usually sharpen at this point rather than each individual element as I go along.
Adjust - Sharpness - Unsharp Mask 5.0 - 30 -5.
Add name and relevant artist copyright and tube licence info.
Save as Png.
Thank you for stopping by and trying out this tutorial. I hope you are pleased with your tag.
Sal :)


.png)