

Supplies Needed
Tube Of Choice. I have used the super artwork of Elias Chatzoudis
PTU Scrap Kit is 'Christmas 2012' By Lori at Scrap It Studio.Com. You can purchase her kits HERE
Font used - GradoGradoo
PTU Scrap Kit is 'Christmas 2012' By Lori at Scrap It Studio.Com. You can purchase her kits HERE
Font used - GradoGradoo
Filters Used
Mura's Meister - Copies
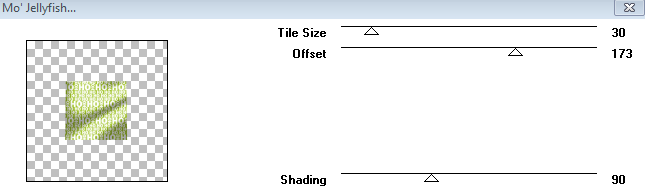
Tramages - Mo Jellyfish
EyeCandy - Shadowlab
Dsb Flux - Linear Transmission
Tramages - Mo Jellyfish
EyeCandy - Shadowlab
Dsb Flux - Linear Transmission
Open a new image 700 x 700.
From the kit c/paste Frame 1 (red) re size to 108%. Position in the centre of canvas.
Apply Dsb Flux - Linear Transmission (settings below)
Duplicate layer. change blend mode on top copy to hard light then merge down.
Add a white shadow using Eyecandy - Shadowlab - No blur- Distance 3 -Direction 270 - Opacity 100.

Add a white shadow using Eyecandy - Shadowlab - No blur- Distance 3 -Direction 270 - Opacity 100.
Above this layer c/paste Frame 2 (green) re size to 110%. D/shadow.
C/paste Red Frame 1 again above the green frame and re size to 102%. Click in centre of red frame with magic wand tool to float the inner. Selections - modify - expand by 2.
C/paste paper 7 re sized to 60%. Invert the selection and hit delete. Select None. Apply Tramages - Mo Jellyfish ( settings below) to paper and move below Frame. D/shadow Frame.
C/paste Star element. Apply Mura's - Copies- Encircle (settings below) Move to the bottom left of tag behind the Green Frame layer. Duplicate and mirror copy to right. Merge down. Duplicate again and flip copy to top. Merge down again and d/shadow.

C/paste Tree element re size to 110% and position in the centre of image. Duplicate re size copy to 0% and position to the left of original. Duplicate again and mirror copy to right. D/shadow all 3.
C/paste your tube and position toward the right of the canvas above Trees. Duplicate, working on top copy add a gaussian blur of 3 and change blend mode to soft light, opacity to 60. D shadow bottom copy.
Continue to add elements of choice from kit. working around tube and Frame layers. D/shadow to your liking. I used ....
Snowflake 1 - 40 %. Make 3 copies. Position at the top of each tree.
Lights - 85% Top of canvas above Tree, behind tube.
Holly - 60% Position top left behind Lights. Duplicate and mirror copy to right.
Santa - 90 %. left side of tag behind left side Tree.
Candy Cane - Mirror. Centre of tag behind tube.
Merge all layers. Crop/re size to your liking. I usually sharpen at this point rather than each separate element as I go along. Adjust - Sharpness - Unsharp Mask 5.0 - 30 -5.
Add name and relevant artist copyright and tube licence info.
Save as Png.
Thank you for stopping by and trying this tutorial. I hope you are happy with your tag.
Sal :)

Add name and relevant artist copyright and tube licence info.
Save as Png.
Thank you for stopping by and trying this tutorial. I hope you are happy with your tag.
Sal :)

No comments:
Post a Comment