Saturday 26 October 2013

PTU The Attic


The Attic was written by Myself on 25th October 2013. It is my own idea and creation. Any similarity to any other tag or tutorial is co incidental.

Supplies Needed
Tube. I have used the amazing artwork of   Arthur Crowe
Ptu Kit is 'Crazy Bride' by Bibi's Collection at  SATC
Mask Big Mask 1 by Vix at  Vix Psp

Font used is Cheap Fire

Filters Used ( optional )

Tramages - Mo Jellyfish
Xero - Nostalgia


Open a new image 700 x 700.
Because we have no template or frame to work around start by creating a centre spot on your canvas.
( we will be deleting this, it's just an aid to placement of our first elements)

So....Using any colour, create a vector circle 200 x 200. Objects - Align - Center in canvas. Convert to raster layer.
Above the centre circle c/paste element 75 Chest Of Drawers re sized to 60%. Rotate right by 2 degrees. Position roughly half way down the circle and line up the right front corner of drawers with the right edge of circle. ( see pic below ) Once in position duplicate. Change blend mode of top copy to screen, merge down and D/shadow.


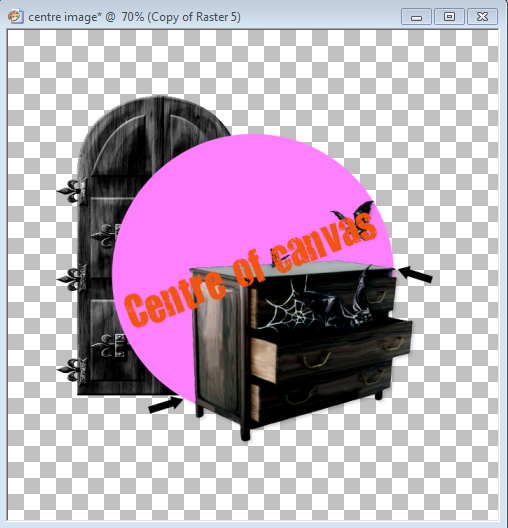
Behind your centre circle and to left side of canvas, c/paste element 43 - Door re sized to 50%. ( again see pic for placement ) Duplicate, change blend mode of top copy to screen, merge down and d/shadow.

With these elements in place, delete your circle.

C/paste your tube and position above Drawers on the left hand side. I positioned my tube to look as though she was rested just on the edge. D/shadow.

 To left of and behind tube c/paste element 74 Trunk re sized to 60% - Image - Mirror - D/shadow.

To the right of canvas behind Drawers c/paste element 40 Armchair re sized to 50% and d/shadow.

Above and behind Armchair C/paste element 4 Window  re sized to 25%. Behind the window c/paste paper  4 re sized to 25%. Position paper to your liking then take your selection tool set on rectangle and make a selection just inside the outer edge of the Window Frame. ( see pic )


Invert the selection and hit delete. Select none. Duplicate the paper layer and change blend mode of top copy to screen. Merge down.
 D/shadow Window Frame and merge down with paper layer. At the top of your Window c/paste 11 Cobweb re sized to 25%. Duplicate to strengthen and merge down.

Before adding the rest of the elements put mask layers in place.

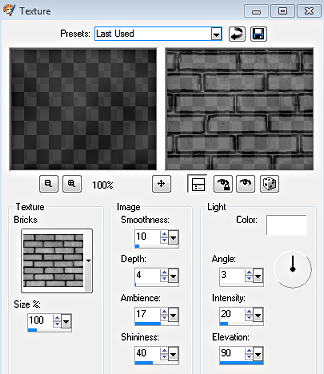
Mask layer 1- At the bottom of layer palette, c/paste paper 7 re sized to 57%. Load mask from disk - Fit to layer. In layer palette - delete mask - merge group.  Use raster deform tool to size and position. Apply Effects- Texture Effects - Brick and set opacity to your liking.


Mask layer 2 - C/paste element 46 Wood Flooring re sized to 57%. Using same mask as before - load mask from disk - fit to layer. In layer palette - delete mask - merge group. Position at the bottom of canvas above mask layer 1. Duplicate to strengthen opacity and merge down.

Continue my adding elements of choice and d/shadow to your liking.

I used....

17  Kitten - 30 %. Right side of canvas. Behind drawers, above Armchair. Duplicate, change blend mode of top copy to hard light, merge down.

20 Doll - 50 %. Bottom right. in front of the Armchair, behind Drawers.

21 Telescope - 40%. Bottom right. Above Doll, behind Drawers.

52 Book Stack - 35% - Rotate right by 3. Bottom right above Drawers. Apply Xero - Nostalgia.


22 Crystal ball - 40%. Bottom right. Above Books.

8 Spider - 20% - Mirror. Bottom right. Above Books.

16 Bottle - 27 % -Mirror - Rotate Left by 3 degrees. Bottom right to left of and above Crystal ball.

29 - Candles - 30%. Bottom left. Above Trunk, behind tube.

67 Open Book - 60%. Bottom left. Behind Candles.

31 Watch - 20% - Rotate left by 3 degrees. Bottom left. Behind Open Book. Above left corner of Trunk.

42 Suit Of Armour - 45% - Mirror. Left of canvas. Above the door, behind Trunk. Apply Tramages - Mo Jellyfish to create a shadow effect.


55 Gold Sparkle - 30%. Place top left behind Armour / Tube. Duplicate and move copy to bottom right behind Crystal Ball.

5 Web - 30% - Flip. Place bottom left behind the Trunk / Open Book. Duplicate and Move copy to bottom right behind the Crystal Ball. Use eraser tool to remove the bits you don't want.

Merge all layers. Crop/re size to your liking. I usually sharpen at this point rather than each separate element as I go along. Adjust - Sharpness - Unsharp Mask 5.0 - 30 -5.
Add name and relevant artist copyright and tube licence info.
Save as Png.

Thank you for stopping by and trying this tutorial. i hope you are pleased with your tag.
Sal :)


Wednesday 23 October 2013

Tut & Tag Show Off


Rhonda has made me a gorgeous new tag and written a tutorial 'Steampunk 2' using my template 24. Visit her blog Rhonda's Rockin' Designz to check it out.
Thank you Rhonda :)


I also these last few weeks had some amazing pressies made for me using my temps and tuts. I love receiving them and showing them off ... so here they are. Thank you to Bee, Anne and KitKat  xoxo


Bee

Bee

Bee

Bee

Bee

Anne

KitKat


Monday 21 October 2013

FTU Boo - Ti - Ful


Boo - Ti - Ful was written by Myself on 21st October 2013. It is my own idea and creation. Any similarity to any other tag or tutorial is co incidental.

Supplies Needed

Tube. I have used the brilliant artwork of  Elias Chatzoudis

Fabulous ftu scrap kit is by Bibi. It is part of the blog train 'Bootiful Night' and is available to download from her blog  Bibi's Collection

Remember to please leave a thank you when downloading :)

Font used is Thufap


Open a new image 700 x 700.

C/paste element 2 - Frame. Re size to 70%. Take magic wand tool and click in centre to float. Selections - Modify - Expand by 3. 
C/paste paper 8 as a new layer. Selections - Invert - Delete.
Select none, move paper layer below Frame. 
D/shadow Frame and merge down.
Apply Tramages - Mo Jellyfish. ( settings I used below )


C/paste your tube and position to the right side of the canvas. D/shadow.

To the left of your canvas, behind Frame c/paste element 58 Tree. Re size to 85% and rotate left by 6. Position so that it is visible above the top of the Frame. Duplicate to strengthen and merge down. Duplicate again and mirror your copy to the right. 
C/paste the element again. This time re size to 50%. Position again behind the frame at the top of canvas where there is a gap between left and right copy of Tree. 
Duplicate this copy and move above frame in the centre of canvas behind tube layer.

At the bottom left of canvas C/paste element 42 Cauldron. Re size to 95%. Position behind tube layer and d/shadow.

Bottom of canvas again. C/paste element 54 - Green Sparkle and re size to 30%. Position centrally then duplicate twice. Move 1 copy to left the other to the right to create a line. Merge the 3 layers and position behind your tube, above Cauldron.

Continue by adding elements of choice from kit and d/shadow to your liking.

I used ....

66 Signpost - 90% - Rotate left by 4 degrees. Position to the left side of Frame behind Cauldron. Duplicate, change blend mode of top copy to multiply and merge down. 

16 Devil / Balloons - 35% - rotate to right by 5 degrees. Place top left behind Signpost. Using eraser tool, remove the Devil so that the cute little balloon faces appear as though there peering just over the Sign. Duplicate, change blend mode of top copy to multiply and merge down. Reduce opacity to 80.

44 Pumpkin Tree - 80%. Position centre of canvas, behind tube layer above Signpost. Duplicate, re size copy to 70% and move to bottom left above Cauldron and Green Sparkle.

61 Book - 60%. Bottom left above Pumpkin Tree, behind tube layer. Duplicate, change blend mode of top copy to multiply and merge down.

47 Cobweb - 30%. Above Cauldron, to left of and behind tube. 

10 Pumpkins - 45% - Mirror Image. Bottom right behind Green Sparkle layer. Duplicate, change blend mode to screen on top copy. merge down.

12 Scarecrow - 25% - Mirror Image. Bottom right. Above Pumpkins, behind tube.

35 Crosses - 20%. Bottom Right above Green Sparkle, behind tube.

36 Stones - 35% Bottom right above Crosses, behind tube.

39 Bubbles - 35%.  Top of canvas, above Frame behind Pumpkin Tree. Duplicate and move copy to left of tag above the Cauldron.

Merge all layers. Crop/re size to your liking. I usually sharpen at this point rather than each separate element as I go along. Adjust - Sharpness - Unsharp Mask 5.0 - 30 -5.
Add name and relevant artist copyright and tube licence info.
Save as Png.

Thank you for stopping by and trying this tutorial. I hope you are pleased with your tag.

Sal :)


Monday 14 October 2013

PTU Freddy's Dream


Freddy's Dream was written by myself on 14th October 2013. It is my own idea and creation. Any similarity to any other tag or tutorial is co incidental.

Supplies Needed

Tube of choice. I have used the amazing artwork of Diana Gali available at  SATC

Matching Ptu Kit is 'Freddy' by Bibi's Collection. Also at  SATC

Mask Wsl 208 by Chelle at  Weescotslass Creations

Font Used - Nightmare 5


Filters Used

Tramages - Mo Jellyfish


Open a new image 700 x 700.
Starting with mask layer...
Add a new raster layer and flood fill with a gradient of your choice. See pic for my gradient settings.


Load mask from disk - fit to layer. In layer palette, delete mask and merge group. Use raster deform tool to re size and position to your liking. Duplicate the layer and change blend mode of top copy to Multiply. Don't merge.


Above mask layer c/paste Element 80 Frame re sized to 50%.
 Click in centre with magic wand to float. Selections - Modify - Expand by 2. C/paste paper 8 re sized to 50%. Position. Invert the selection and hit delete. Select none. Apply Tramages - Mo Jellyfish with settings below. Repeat. Move paper layer below Frame. Go back to selections and working on paper layer, Select all - Float. C/paste Element 96 Ghost 1 Re sized to 30 %. Position towards the left.
De Float - Invert - Delete. Select none. Reduce opacity of Ghost to around 20% and merge layer down with paper layer.


Back on Frame layer. Take your magic wand tool and click inside the cut out section of the frame to float. Selections Modify - Expand by 2. Add new raster layer and flood fill the floating selection with gradient used on mask layer. Select none. Move below frame layer apply Mo jellyfish as before. Duplicate layer, change blend mode of top copy to Hard light. Merge layer down with original then merge Frame down with this layer.

D/shadow Frame and merge layer down with paper layer.

C/paste Element 18 Tree 1 re sized to 70%. Position behind Frame on the right. Duplicate and mirror copy to left side above the Frame. D/shadow.

C/paste Element 21 Tree 2 re sized to 70%. Position behind  Frame at the top of canvas. D/shadow.

C/paste your tube above Frame on the right side of canvas. D/shadow.

Work desired elements from kit around frame and tube layers and d/shadow to your liking. I used .....

41 Barbed Wire - 50%. Behind Tree/tube across centre of paper and Frame. Use eraser tool to remove excess that shows to the right of tube.

51 Hand Print - 30% Position top left of frame. Behind Tree.

14 Bird - 25%. Top left, above Tree.

2 Web - 50% - Mirror. Position bottom left of Frame, above Tree. Duplicate and move copy to top of tag behind left side of tube.

5 Jar - 70%. Bottom left, above Web layer.

118 Eyeball - 40%. Bottom Left. Position behind Jar so that it appears to be sitting in there.

103 Chainsaw - 60%. Bottom left. Above Jar.

112 Spider - 60% - Rotate right 21 degrees. Bottom left above Chainsaw. Duplicate and change blend mode of top copy to screen. Shadow the bottom copy.

13 Bones - 60%. Bottom of tag. Behind and to right of Chainsaw. Above tube layer.

130 Rose - 50 % - Rotate right by 12 degrees. Bottom of tag. Above Chainsaw and Bones.

50 Fire - 40%. Position above bottom of tube behind Bones. Duplicate and move copy up slightly behind left side of tube. Duplicate again Mirror and position this copy bottom right of  tag above tube layer.

8 Razorblades - 50%. Bottom right, above Fire.

66 Blood - 40%. Position behind tube on the right. Duplicate and move copy behind Chainsaw.

66 Blood - 20% - Mirror. Make 5 copies and position randomly along bottom edge of tag behind elements.

29  Lamp- 70% - Mirror. Top right, behind tube.


Merge all layers. Crop/re size to your liking. I usually sharpen at this point rather than each separate element as I go along. Adjust - Sharpness - Unsharp Mask 5.0 - 30 -5.
Add name and relevant artist copyright and tube licence info.
Save as Png.


Thank you for stopping by and trying out this tutorial. I hope you are pleased with your tag.
Sal :)


Thursday 10 October 2013

FTU Ding Dong The Witch Is Dead


Ding dong was written by myself on 10th October 2013. It is my own idea and creation. Any similarity to any other tag or tutorial is co incidental.

Supplies Needed

Tube. I have used the fantastic artwork of Alfadesire. Available from Pics For Design


Amazing Ftu scrap kit is 'Halloweeny' by Mirella at A Space Between
Its a full size kit so its quite large but it is downloadable in parts and truly a fantastic kit.
( Great news !! Mirella has now re uploaded this fab scrap kit to her blog and it's available in tagger size. Please note though when I wrote the tut sizings for elements are for full size kit )
Please leave a thank you when downloading :)

Mask Wsl167 by Chelle at Weescotslass Creations

Font Used Rock & Roll Typo - Crazy

Filters Used

Xero - Radiance
Tramages - Mo jellyfish


Open a new image 700 x 700.

From kit c/paste Element 5 Black Frame re sized to 20%. Rotate by 90 degrees. Using magic wand tool click in centre to float. Selections - Modify - Expand by 3.
C/paste paper 3 re sized to 20% and position as desired beneath the selection. Invert the selection and hit delete. Select none and move paper layer below frame.
Apply Xero - Radiance to paper layer ( see settings below) 
Apply Tramages - Mo Jellyfish to Frame ( settings below) D/shadow and merge the 2 layers.


On the right side of your canvas, toward the bottom right of frame( refer to my tag for placement) C/paste Element 28 Black Leaves, re sized to 17%. Duplicate and Mirror copy to left. Merge the 2 layers. I used Manual Color Correction to change the colour from black to the green in the Cauldron. D/shadow and move layer below Frame.
 Above this layer, again bottom right of canvas, C/paste Element 22 Black Tree Branch re sized to 25%. Rotate left by 12 degrees. Duplicate and mirror copy to right, merge down and d/shadow.

C/paste your tube to the right side of frame and d/shadow and to the left of the frame ( behind tube layer) c/paste Element 18 Cauldron re sized to 27%. D/shadow.

C/paste Element 25 Legs, re sized to 25%. Image - Flip. Position over Cauldron and use eraser tool to remove bottom part of legs that exceed the rim and front of the cauldron so it appears that the witch is upside down in there ! D/shadow. Behind the legs c/paste Element 17 Bat re sized to 15%. Position above Cauldron just resting on the rim. D/shadow.

On the top left hand corner of Frame behind Bat layer, c/paste Element 29 Leaf re sized to 8%. Rotate right by 18 degrees and d/shadow.

Continue to add desired elements from kit and d/shadow to your liking... I used...

21 Web - 12%. Position on right side of canvas behind tube. Duplicate and place copy to the left of your tube above the Cauldron.

31 Spider - 15%.  C/paste and position to the left of your tube so it appears to be dangling from Web.

34 Autumn Leaves - 20%. Bottom left of canvas above Cauldron.

40 Eyeball - 10%. Bottom left behind Leaves.

8 Frog - 10%. Bottom left above Leaves.

50 Bow - 10%. Bottom right of canvas behind tube and Branch.

Mask Layer - C/paste paper 2 re sized to 20%. Move to bottom of layer palette. Load mask from disk - fit to layer. In layer palette, delete mask and merge group.

Merge all layers. Crop/re size to your liking. I usually sharpen at this point rather than each separate element as I go along. Adjust - Sharpness - Unsharp Mask 5.0 - 30 -5.
Add name and relevant artist copyright and tube licence info.
Save as Png.

Thank you for stopping by and trying this tutorial. I hope you are pleased with your tag.
Sal :)


FTU Bewitched


Bewitched was written by myself on the 9th October 2013. It is my own idea and creation. Any similarity to any other tag or tutorial is co incidental.

Supplies Needed

Tube. I have used the beautiful artwork of Jessica Dougherty. Available from CDO

Fabulous Ftu Scrap kit is 'Witches Den' by Vaybs at  Designs by Vaybs

Please don't forget to leave the designer a thank you when downloading freebies :)

Mask 451 by Vix at  Vix Psp

Font used is Zombie Holocaust


Open a new image 700 x 700. 
Starting with the mask layer. Add a new raster layer and floodfill with black. Load mask from disk - fit to layer. In layer palette, delete mask and merge group. Duplicate layer and re size 80%. Using manual color correction change the colour of this mask layer. I took a red from my tube. Merge layer down.

Above mask layer c/paste Element 19 - House re sized to 80%. D/shadow.
Above House layer c/paste Element 8 Cloud/Mist re sized to 70%. Position across the bottom of the house. Below and behind the Cloud c/paste Element 29 Grass re sized to 90%.


C/paste your tube. Position just off centre on the left of canvas and d/shadow. Now work desired elements from kit around tube layer and d/shadow to your liking. I used ....

49 Tree. Left side of canvas. Above House, behind tube and Cloud/Mist layer.

47 Hanging Stars - 30%. Position left side of canvas above Tree. To appear as if hanging from branch.

16 Tombstone - 70 %. Left of canvas. Behind Cloud/Mist, above Tree layer.

28 Rose Cluster - 105%. Bottom of canvas, behind tube above Tombstone.

38 Cat - 60%. Image- Mirror. Bottom left of canvas. Above the Cloud/Mist layer, behind tube layer.

3 Open Book - 40% Bottom left of tag beneath Cat.

82 Bat - 40%. Top right of canvas.

77 Bats - 50%. Top right of canvas, behind House layer.

37 Book Stack - 60%. Bottom right above Rose Cluster.

76 Candles - 30%. Bottom of canvas above Book stack.

69 Urn - 40%. Bottom of canvas above Candles.

20 Flower - 30% - Rotate left by 90 degrees. Position at bottom of tag above tube. Duplicate and mirror copy.

57 Web - 30%. Right of canvas, behind Rose Cluster.

73 Crow - 50% - Image - Mirror. Position on right above Book Stack.

72 Foliage - 50%. Right side of canvas, behind book stack. Duplicate, mirror copy to left and position behind Tombstone.

Merge all layers. Crop/re size to your liking. I usually sharpen at this point rather than each separate element as I go along. Adjust - Sharpness - Unsharp Mask 5.0 - 30 -5.
Add name and relevant artist copyright and tube licence info.
Save as Png.

Thank you for stopping by and trying this tutorial. I hope you are pleased with your tag.
Sal :)


Related Posts Plugin for WordPress, Blogger...